I hope you can join me on Saturday, October 25 at Paper Niche as we continue to explore layers to add visual interest to your projects. On Saturday, we'll be exploring gold leafing! I've added it to a leaf punch on plain white paper and created a card out of it. This is a really fun technique with lots of possibilities, especially in the Fall when you want to add a touch of gold to your projects. The Make-N-Take starts at 10:30 and 11:30 and runs about an hour to complete. Cost is $2.00.
Showing posts with label Paper Niche. Show all posts
Tuesday, October 21, 2014
Monday, October 13, 2014
October Make-n-Takes at Paper Niche
Coming up fast are the October Make-n-Takes at Paper Niche. I'll be in the store for the next two Saturdays and I'd love to see you there. The focus in October is on layers and in the first session, we'll be creating a fun Halloween Card with texture and layers for interest. Along the way, we'll be talking about how to transfer that idea to your scrapbook pages and home decor items. Come join us on Saturday, October 18 from 10:00 am to 12:30 pm. The cost of the Make-n-Take is $2.00. See you Saturday!
Thursday, March 13, 2014
Happy Tails!
I thought I'd show you a layout I did as part of the Design Team at Paper Niche. Inspiration was the new "Happy Tails" collection and my daughter's 11 year old Cocker Spaniel, Autumn. Autumn, as the name implies, is a rust colored Cocker and I can't wait to see her photos in this layout.
I started with 2 sheets of the "Bow Wow" paper, trimmed 1/2" off two sides and matted it with a dark teal card stock that matched the collection. The "Dots" paper was cut in half. I cut the "Stripes" paper into strips and used the puppy paws section of the paper as a border around the "Dots". I inserted eyelets and ran ball chain through it and popped the whole section up with Pop-Dots. The puppy, swirls and title all came from the chipboard sheet. I used the "Jewels" to accent the swirls and one of the collars in the upper right. The small dogs looking on from the bottom left are the bottom half of the "Jewels" packaging line. Never throw anything away! The puppy's collar was made with a sliver of the off-cut from the red chipboard piece. Enjoy!
Thursday, February 27, 2014
Stationer's Desk Lay Out
Last Sunday the Team from Paper Niche got together to create items from some of the new Prima and KaiserCraft lines just released at CHA. I spent the time playing with the new Stationer's Desk papers from Prima.
My inspiration was a design by Frank Garcia that he shared through Prima UTube. The next time you're in Paper Niche, check out the wall behind the cash register, it's filled with Prima and KaiserCraft goodness!
Sunday, June 17, 2012
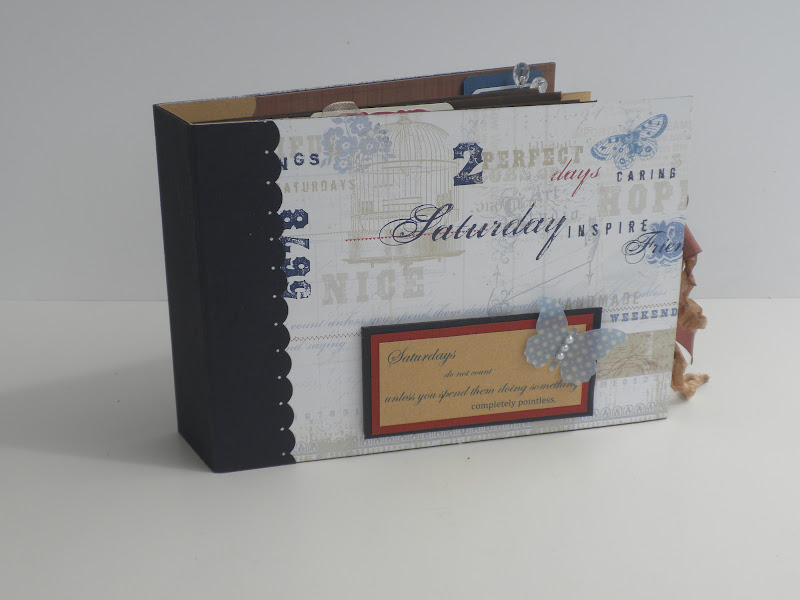
"Saturdays" Album Class
Yesterday I had the pleasure of
teaching the “Saturdays” album class at Paper Niche. Thanks to both Kate and Beatriz for taking the class. They asked that I put pictures of the
album up on my blog, so grab a cup of your favorite refreshment, sit back and
enjoy!

Inside cover. The directions for this sweet envelope can be followed from the April 25 blog post titled "a Pocket Tutorial".

The rest of these pictures are in the order that they appear in the album. This is Page 1 and front of tag insert. The ticket is held on with Tissue Tape and can be flipped up. Cute journaling block!

I adhered the jeweled lace with Helmar's.

The "Love" sticker is backed with a Nestabilities label and backed with chipboard for dimension

Sweet Roses on the top are dimensional and adhered with Helmars Scrap Dots. Love that stuff !

The "Sweet Life" sticker is backed with a Nestabilities oval.

Another small journaling block attached with tissue tape that flips up. The rust lace is held on with Helmars.

Blue flowers are attached with Helmars.

The ticket is tabbed to lift up and reveal a 2 page mini using tissue tape as binding.

Another small dimensional sticker raised with scrap chipboard and finished with organza ribbon.

2 layers on the flower embellishment. first the doily ( I used a good coat of spray adhesive on the back), then the leaves, then the flower cluster mounted on chipboard.

Tim Holtz's Rosette Die was used as an embellishment. The lace is held on with Helmars.

A simple back cover
I love this album for lots of reasons. The paper is what I call "gender neutral". Add some metal, highlight the blue and it becomes masculine. Add some lace, highlight the rusty red, and it moves to the feminine side.
I love that you can change out the "Distressed Doily" On The Edge die we used for the envelope tag insert with just about any die in the Tim Holtz collection and change the feel of the album. Use the Iron Gate, some orange and black paper for Halloween, the File Tabs die and bright primary colors for a cute school days album or the Steampunk die for a grungy guy tribute!
I love the amount of real estate in it! Tons of room for photos and for journaling. Lots of the papers in the album have a light background so you can journal just about anywhere on it, and who doesn't love a Saturday?
| Inside cover. The directions for this sweet envelope can be followed from the April 25 blog post titled "a Pocket Tutorial". |
| The rest of these pictures are in the order that they appear in the album. This is Page 1 and front of tag insert. The ticket is held on with Tissue Tape and can be flipped up. Cute journaling block! |
| I adhered the jeweled lace with Helmar's. |
| The "Love" sticker is backed with a Nestabilities label and backed with chipboard for dimension |
| Sweet Roses on the top are dimensional and adhered with Helmars Scrap Dots. Love that stuff ! |
| The "Sweet Life" sticker is backed with a Nestabilities oval. |
| Another small journaling block attached with tissue tape that flips up. The rust lace is held on with Helmars. |
| Blue flowers are attached with Helmars. |
| The ticket is tabbed to lift up and reveal a 2 page mini using tissue tape as binding. |
| Another small dimensional sticker raised with scrap chipboard and finished with organza ribbon. |
| 2 layers on the flower embellishment. first the doily ( I used a good coat of spray adhesive on the back), then the leaves, then the flower cluster mounted on chipboard. |
| Tim Holtz's Rosette Die was used as an embellishment. The lace is held on with Helmars. |
| A simple back cover |
I love this album for lots of reasons. The paper is what I call "gender neutral". Add some metal, highlight the blue and it becomes masculine. Add some lace, highlight the rusty red, and it moves to the feminine side.
I love that you can change out the "Distressed Doily" On The Edge die we used for the envelope tag insert with just about any die in the Tim Holtz collection and change the feel of the album. Use the Iron Gate, some orange and black paper for Halloween, the File Tabs die and bright primary colors for a cute school days album or the Steampunk die for a grungy guy tribute!
I love the amount of real estate in it! Tons of room for photos and for journaling. Lots of the papers in the album have a light background so you can journal just about anywhere on it, and who doesn't love a Saturday?
Sunday, May 27, 2012
Happy Memorial Day Weekend!
Started off the weekend with a Friday Crop at Paper Niche. Nice to be able to create with a group of like minded people who offer support and inspiration. On Saturday we braved Ft. Lauderdale Beach for a family picnic and to celebrate a birthday. Great weather and we got to watch part of the Beach Volleyball tournament that was happening on the beach.
Traffic in the morning wasn't bad, we got there early. But trying to get out at 4:00 pm reminded me why we don't go to the beach on weekends. Between the bridge going up on 17th street and trying to navigate all the traffic from multiple event on the beach for Memorial Day Weekend, it took us about an hour to get home.
Checked my email this morning and was delighted to discover that I'd been included in another Treasury on ETSY, this one themed for Memorial Day Weekend. This is the Photo Album that was included in the treasury.
You can see the entire treasury here:
Enjoy the rest of the weekend. I'm going to pay a visit to my dad and thank him again for serving in WWII. After all, it's why we celebrate this weekend.
Subscribe to:
Posts (Atom)